QUILT
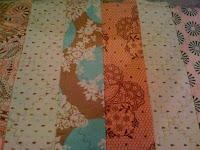
First I cut all my strips into 5 inch pieces, and then laid them out on the table to make sure I didn't end up with two of the same pattern next to each other.

Then I'd pin two strips right-sides to each other and make sure they were ironed well. Some may say this is tedious, I found it relaxing!
(Side note - you probably don't NEED to pin them together since they're such small pieces, but I'm straight-pin happy!)

Next it was time to sew them all up! I'm so glad I finally learned the chain-method of quilting, otherwise this would've taken me FOREVER.

After sewing them all together, it was time to separate and iron again. Did I mention I find ironing relaxing?
 That's all for tonight. Can't wait to work on it some more! (At least all tonight on the quilt...see below for the diaper bag!)
DIAPER BAG
Pretty, pretty fabric. I used a jelly roll called "hush-a-bye" (the same fabric the original "recipe" called for - although I changed up the colors a little bit on mine) by Moda fabrics, some solid brown fabric, some soft pink minky fabric, and some yardage by Moda fabrics as well.

Here I am sewing the pockets together.

And here I am quilting the pocket pieces. First this way...then the other way. And with my new sewing machine (thanks again, Dave!!!) I was able to do a fun, curvy, kind of stitch. I really like how it turned out.

Here's one of the pockets all put together....

Making the handles for the diaper bag:

Here is the front of the bag with the trim attached to the pockets, and the handle sewn own.


And HERE!!!! Here is the (almost) finished project!!!
If you're interested in making either of these projects on your own, you'll find the tutorial here:
That's a really cool bag. I would love to be able to do that. To have the time. lol. that's the hard part. I miss you all so very much. I often think about a large family reunion and ....well...... we are all so far apart.Love to you all. Uncle Stan
ReplyDelete